
Sunday, February 26, 2012
It's alive!
It idles, but still plenty of work to do. I'm still not sure about timing, so I'm going to think about that for a bit and see if Brian at PE has any helpful tips.
Friday, February 24, 2012
Progress Updates
Suspension and steering (the steel versions) manufacturing is now done with the addition of the front push rods and ARBs.
The next step for suspension is to set the car on the ground (waiting on wheel studs to come in - the order had to be re-placed yesterday, so mid next week maybe?). We will probably throw on some old upright anyways for SAE Carolinas on Tuesday, so once the car is on the ground I can get an idea of pushrod settings and alignment.
We're getting everything ready to crank the engine tomorrow, so hopefully everything will go smoothly and we can set idle soon. If we can get cooling and fuel mounted tomorrow during they day, we should be ready to crank by tomorrow night.
 |
| Anti-roll bars, ready to be put into the car |
We're getting everything ready to crank the engine tomorrow, so hopefully everything will go smoothly and we can set idle soon. If we can get cooling and fuel mounted tomorrow during they day, we should be ready to crank by tomorrow night.
Sunday, February 19, 2012
What a day...
Yesterday was an... interesting day. Lots of things went wrong - first, the torch for the welder broke (the threads for the back cap gave out). Next, the mill broke - it won't boot up any more. Finally, we found more clearance issues with the drivetrain and had to cut out the rear frame tubes (again) and replace them.
I have no idea what we're going to do about the mill yet, but it's not going to be a cheap or quick fix. It's not a great time for the mill to break, but it's not the worst time either. We don't have too many CNC parts left to do, so we can probably ask for a few favors to get back on track. But the dent it's going to put in our budget really worries me.
I have no idea what we're going to do about the mill yet, but it's not going to be a cheap or quick fix. It's not a great time for the mill to break, but it's not the worst time either. We don't have too many CNC parts left to do, so we can probably ask for a few favors to get back on track. But the dent it's going to put in our budget really worries me.
Wednesday, February 15, 2012
Drivetrain update
We had a slight problem before where the drivetrain didn't fit on our frame mounting points. That issue has now been resolved by milling down one diff cap, and everything fits fine now. The lower mounting tabs still need to be made and welded in, shims need to be made, and half shafts need to be cut to length.
 |
| Before - notice how the right bearing carrier doesn't match the frame mount location |
 |
| After - all fixed |
More suspension updates
I have everything I need to finish putting together the suspension now except for pushrod inserts. Steering is set, tie rods are set, and I have everything I need to put together the bellcranks.
 |
| Setting the steering rack length |
 |
| Tie rods ready to be welded |
 |
| Checking the total steering travel. Turned out to be exactly what I expected from the CAD model. |
Fan controller and SMT soldering
I received the PCBs for the fan controller a few days ago, and I soldered them up today. The purpose of the fan controller is to take the PWM signal from the ECU (open source) and convert that to a PWM signal for the fan. Since the fan only runs in one direction, there's only one MOSFET needed, and the circuit becomes pretty simple.

Sunday, February 12, 2012
Suspension Progress Update
Suspension is getting close to being done. Me and Bharat reamed and chamfered the bearing carriers and staked in the spherical bearings last night, and me and JP broke in the bearings and attached them to the car today. Steering is almost done too - I just need to set the rack length, and it'll be good to go. The steering column are already drilled, welded, and attached. We have almost everything we need for suspension and steering, and the goal is to have a rolling chassis by the end of the week.
More pictures after the jump.
 |
| A pile of a-arms |
Making the fuel tank, part 2
So I ran into an issue today when welding the fuel tank, namely the placement of the fuel pickup bung. It ended up too close to the main box, and I melted the bung trying to weld in the box. Oops. We cut it off, and welded a new one on the back of the tank instead, which should be okay - it just necessitates slightly different fuel routing.
 What I ended up doing:
What's left? I need the sight line tubes to be made in the lathe, and then those need to be welded to the filler neck. The filler neck then needs to be welded to the main box, and bungs for the check valve and return need to be welded in. Finally, mounting tabs need to be welded on. All of this should be done before the end of the week.
 |
| Nope, not good enough at welding to weld that yet... |
 |
| Not pretty, but it works. |
More random pictures
Other random stuff that we did today:
So the drivetrain for some reason doesn't quite fit the CAD model, and the bearing carrier is offset by about a quarter of an inch. We need to mill down a diff cap and re-press the drivetrain bearing to make the drivetrain fit where it's supposed to.
 |
| John, your ECU box is finally in |
 |
| Muffler endcap. No, that little hole should not be there. Will need to plug it with weld. |
|
| Figuring out how long the chain needs to be. Turns out it needs to be 50 links, exactly what CAD predicted. |
Thursday, February 9, 2012
Thanks to the Alumni who donated to the Team!
I would like to thank the alumni who made donations to support the team. The whole team really appreciates given that it is a crucial part of the support we get and it allows us to do all the things we do. Without this support we would not be able to build a new car every year.
Thanks to Chris Relyea, James Montupet, Jules Finley and William Gardner for all of their help and support.
Thanks to Chris Relyea, James Montupet, Jules Finley and William Gardner for all of their help and support.
Wednesday, February 8, 2012
More random machining
Seems like there's always more machining to do...
 |
| Wing endplates for the moving element + one that I messed up in the background |
Sunday, February 5, 2012
How to notch tubes the easy way
If you have a tube designed in CAD, the easy way to grind it to the shape that you want is to unfold the tube in CAD, print it out, tape it to the tube, and grind away.

Saturday, February 4, 2012
More progress updates, 2/4/12
Today was an extremely productive day. The engine is now in, electric panels are mostly done, and stuff is getting mounted to the car. We did a lot of work with carbon fiber today - we did the initial layup on the five wing sections and did the first part of a new seat.

We got our wings from Bob at Flying Foam. He did our test wings last year too, and the quality was top notch once again.
 Lots more pictures of carbon fiber after the jump.
We got our wings from Bob at Flying Foam. He did our test wings last year too, and the quality was top notch once again.
 |
Friday, February 3, 2012
Making the fuel tank, part 1
We make our fuel tank out of sheet aluminum. We design it in solidworks, cut out each of the pieces, bend the pieces where appropriate, and then weld everything together. The main fuel tank box looks something like this:
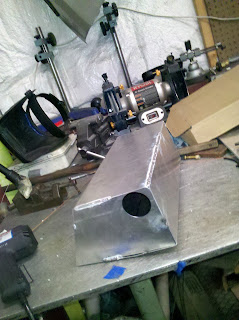 |
| Partially welded fuel tank main box |
Thursday, February 2, 2012
Progress Update 2/2
A quick progress update:
Things are moving along about as quickly as I could hope for. I finished welding the engine mounts, steering mounts, diffuser mounts, and steering tubes today, and so the engine is ready to be dropped in. This will happen on Saturday.
A couple more pictures after the jump
Things are moving along about as quickly as I could hope for. I finished welding the engine mounts, steering mounts, diffuser mounts, and steering tubes today, and so the engine is ready to be dropped in. This will happen on Saturday.
 |
| The frame as it sits (upside down). Diffuser mounts, steering column, and engine mounts are the new additions |
Spherical bearing staking tool
To stake our spherical bearings, a special tool is required. We managed to break one of the two halves last year, so we needed a new one. I thought about buying one, but I had some extra stock laying around that wasn't going to be used for anything else, and now that our mill is fixed, I decided to just make one. Took about half an hour from start to finish, and I got to use one of our fancy five-flute carbide end mills. Nice mill bits make a world of difference...
A couple of pictures of the machining after the jump.
 |
| The finished product |
Wednesday, February 1, 2012
Mill Fixed
So a few days ago our static phase converter stopped converting 1 phase power to 3 phase power and instead decided to convert 1 phase power to smoke.
Luckily, Dr. Simmons (our advisor and an overall great guy) had an extra VFD lying around, so I've spent the past couple days attaching it to the mill. You'd think that something like this would be a simple wiring job, but of course it turned out to be more complicated than I would have liked.
Luckily, Dr. Simmons (our advisor and an overall great guy) had an extra VFD lying around, so I've spent the past couple days attaching it to the mill. You'd think that something like this would be a simple wiring job, but of course it turned out to be more complicated than I would have liked.
 |
| Our new VFD, attached to the side of the DRO. It works with the original mill controls, and provides a handy current readout for monitoring load |
Subscribe to:
Comments (Atom)