Duke University Motorsports is a student group that designs and builds open wheel, single seat race cars to compete in the Formula SAE competition sponsored by the Society of Automotive Engineers. The team consists of Duke students from both Pratt and Trinity, in all classes. The purpose of the team is to provide students with a way to gain practical design and manufacturing experience in a fun and challenging setting.
Sunday, April 8, 2012
Making Bodywork, Part 1
We've starting making the bodywork for this year. There is foam everywhere in the garage now, and we're less than 1/8 of the way done making the molds.
The first few pieces of the bodywork molds
Because of budget constraints, we're making the bodywork molds ourselves this year on the mill. They will be milled out of small blocks of foam (due to table travel constraints on our mill) and glued together.
It's snowing in Durham, NC
Over the next couple weeks, I'll do a reasonably detailed writeup of the process. The first steps are to prepare the bodywork molds from the CAD models.
The way I modeled the bodywork was using surfaces. Though I don't think mastercam really has too much of an issue with surfaces, I solidified all the surfaces into solids by extruding up to the surfaces. The easiest way to do this in my opinion is to use convert entities to project the outline of the surface onto your sketch plane, and then extrude up to the surface. There are always issues with extruding up to surfaces; the most common are gaps in the surface, the boundary of the extrude not being consistent with the surface, gaps in the sketch from selecting the wrong edge when converting entities, etc. Sometimes it's easier just to offset the outline inwards a little bit if the problem with the extrude is at the boundary.
extrude up to surface
The main reason I solidified everything this year was because we had to buy our own foam and I wanted to know what size blocks and how many I would have to purchase. I did this for all the pieces of the bodywork, and put together a foam order.
There ended up being 41 pieces total for the 5 bodywork panels, of those 33 are machined and the rest are blocks used as purchased.
We purchased the foam from Universal Foam, who got us the 2lb EPS very quickly (5 days from when we ordered to when we received shipment) and at a great price.
Pallet of foam- we put some of it in the garage already. This is what wouldn't fit in the garage.
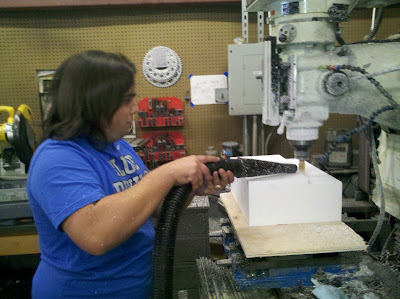
Mounting the foam on the mill turned out to be a lot easier than we expected. Me and JP basically cut a piece of wood approximately the size of our working envelope (24"x12"), screwed it into a 2x4 that we clamped into the vise, and then milled the edges of the wood board to square it off. We reference the foam to this wood plate to square it off, and zeroed Z off of the wood board. We attached the foam to the wood using double sided tape (the flooring tape - the thin, tacky stuff that's really hard to get off). This tape works quite well actually and it doesn't pull apart the block of 2lb EPS like it does with the cheaper 1lb EPS.
Using Mastercam's surfacing operations is pretty easy. With foam, you can feed pretty freaking fast. We were running about 80-100ipm with a 1in bit, 2200rpm with a 1" depth of cut and full radial engagement. Probably could have gone even faster or deeper.
Toolpath for one of the blocks. First, I face the part of the material that's not used. Next, I surface the flatish surface, and finally I cut the outside contour.
Removing the part tends to be a bit more difficult than putting it on. The trick is to slide something thin and sharp between the wood and the foam block (we used the blade of our wood saw, which worked very well) to break the tape and pry the foam off of it. Then, clean up the tape on the wood (which can be difficult, because it's so thin and tacky). Eventually, the tape will pile up to the point where you'll have to face off the wood board.
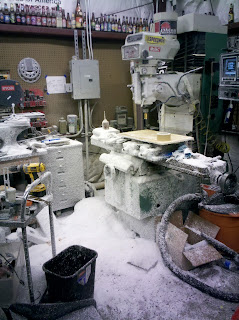
Needless to say, foam did start piling up in the garage very quickly. It's a mess in there right now, and it's going to stay that way until the bodywork molds are finished.
The beginning of the night. Notice how (sort of) clean the garage is.
Milling the first piece. Starting to get a little bit white.
Taking the first piece off
after the third piece
A little while later
At the end of the night
Anyways, the molds looked great out of the mill, and they'll barely need to be filled and sanded in prep for the carbon fiber. The pieces fit together nicely, so we're just going to crank through the rest of the pieces over the next couple weeks.


No comments:
Post a Comment